
Product Description of Coated Bone Screw
Product Overview
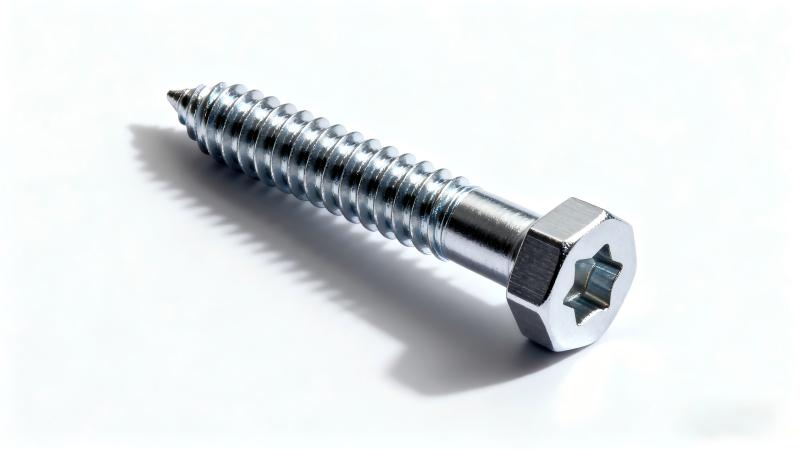
This product is a medical bone screw suitable for fixing cancellous bone and cortical bone. We offer two different length specifications (150mm and 260mm), which can be cut to the appropriate size before or after implantation according to your needs. Each length of screw offers 7 thread length options, ranging from 30mm to 90mm, with increments of 10mm. Please refer to the detailed data in the attached table for specific size parameters. All screws can be selected from uncoated or hydroxyapatite coated versions.
Product characteristics and scope of application
This series of bone screws is designed specifically for use with external fixation systems and is suitable for the fixation treatment of long and small bones. The product offers a variety of thread designs, diameter and length combinations, as well as coating and uncoated options, which can be selected based on the bone size, bone condition, and soft tissue situation of different anatomical parts (including upper limbs, lower limbs, pelvis, hands, and feet). We offer two material options: stainless steel and titanium alloy.
This product is a professional medical device, and physicians using this product must have complete knowledge of orthopedic fixation surgery, be familiar with the clinical application of bone screws, and postoperative management standards.
Cone-shaped bone screw
This type of screw adopts self tapping thread and conical design, which can generate increasing radial preload force during implantation. This feature can achieve firm fixation in the entrance cortex area, which is usually the first area to experience loosening problems. We offer two types of products: self drilling and non self drilling, both of which come with sterilized and non sterilized packaging. The screw shaft diameter and thread specifications offer a variety of size options.
Cylindrical bone screw
This type of screw adopts a cylindrical self drilling and self tapping thread design. We offer a variety of total lengths (including 25mm connectors) and thread length options, with both sterilized and non sterilized packaging available.
Advantages of hydroxyapatite coating
The limitations of traditional bone screws
The traditional metal bone needle has a tip and thread at the front end for easy implantation, and a tail design for easy coordination with surgical tools. In orthopedic surgery, there are risks such as deep implantation, loose threads, and skin contact infections.
Technical improvement of coated screws
Hydroxyapatite coated bone needles are coated with a special layer on the surface of the thread, which promotes a tight bond between the screw and the bone, enhances fixation stability, and reduces the risk of loosening. There is a spherical limit structure from the end of the thread to the light rod, which can effectively prevent excessive implantation and reduce the risk of infection.
Research generally suggests that loose bone needles increase the probability of infection, and complications of external fixation treatment mainly include needle tract infections and loosening of fixation devices.
Advantage 1: Promote bone integration
The experimental study compared the performance of uncoated, hydroxyapatite coated, and titanium coated screws: only hydroxyapatite coated screws showed direct contact between the bone and the thread, resulting in osseointegration.
-Uncoated metal surface: Lack of substantial bonding between metal and bone, which may lead to macroscopic looseness in some cases
-Hydroxyapatite coating surface: Bone tissue can grow into the interior and surface of the coating, gradually blurring the material interface
This biological combination forms a strong anchoring effect, ensuring long-lasting stability and allowing the bone screw structure to withstand repeated loads without loosening.
The success of external fixation treatment depends on the balance between the stability improvement brought by the maturation of callus tissue and the unstable effect caused by screw loosening. Maintaining the integrity of the bone screw interface is the key to achieving good therapeutic effects.
Hydroxyapatite coated bone screws can provide long-term stable fixation effect, reducing the need to replace the fixation system midway.
The conical thread design complements the hydroxyapatite coating. During implantation, each thread cuts a slightly larger path in the bone, providing excellent grip, enhancing fixation, and reducing the probability of loosening.
Advantage 2: Enhance fixed strength and reduce looseness
Clinical studies compared the implantation torque and extraction torque of uncoated and hydroxyapatite coated screws.
There was no significant difference in implantation torque between the two groups at different locations (metaphysis and diaphysis) (p-values of 0.282 and 0.268, respectively). However, the pull-out torque of hydroxyapatite coated screws was significantly higher than that of uncoated screws in all locations (p<0.0001 for both anatomical sites). The extraction torque of coated screws was significantly higher than their implantation torque (metaphyseal p<0.0001, diaphyseal p=0.020), while the extraction torque of uncoated screws was significantly lower in both locations (p<0.0001). The removal of hydroxyapatite coated screws does not require hospitalization, sedation, or anesthesia. The same study also showed that using coated screws in the metaphyseal region can significantly reduce the degree of looseness.
Advantage 3: Reduce needle infection rate
Further clinical studies have shown that the incidence of needle tunnel infections using hydroxyapatite coated screws is significantly lower than that of uncoated screws (p<0.05). When using uncoated screws, there is a significant correlation (p<0.001) between needle infection and the position of metaphyseal implantation, while this correlation was not found when using coated screws (p>0.12).
technical details
The thread diameter gradually transitions from 6.0 millimeters to 5.6 millimeters. The taper design can provide radial preload during implantation, maintaining a firm fixation of the first cortex, which is particularly important for unilateral external fixation. The taper is precisely calculated to allow for limited withdrawal after implantation without causing significant loosening. The inherent elasticity of bones makes this characteristic possible. But the exit rotation should not exceed two full turns, excessive rotation may cause loosening.
All screws are equipped with tip and groove designs, and in most cases, they can be self drilled and implanted without pre drilling, regardless of whether they are coated or not. It is usually recommended to directly use a hand drill for implantation. But when implanting self drilling screws in the backbone area, it is recommended to perform pre drilling: when the bone is hard, use a 4.8mm drill bit with a guide plate; When the bone is poor or the epiphyseal cortex is thin, it is recommended to use a 3.2mm drill bit.
Operation Guide
Choose the appropriate thread and rod length
This series of bone screws is suitable for implantation points with a bone diameter greater than 20 millimeters. If it is less than 20 millimeters, smaller diameter screws should be used. Be careful to implant the screw in the center of the bone axis, as lateral implantation may weaken the bone strength.
A dedicated measuring ruler can be used to determine the appropriate thread length. This ruler can be used under X-rays or directly for limb measurements. We recommend the direct limb measurement method, as X-rays may have uncertain magnification effects and it is difficult to accurately locate screw positions in areas of bone thinning, such as the proximal tibia. By placing the ruler at the predetermined screw position on the limb, the accurate thread length can be directly read from the image intensifier screen.
Screw implantation process
1. Make a 15-20 mm incision to ensure that the skin around the screw is not too tight. Deep tissue requires extensive blunt dissection until reaching the bone
2. Place the screw guide plate perpendicular to the longitudinal axis of the bone. Use a probe to locate the midline through palpation. Gently press the guide plate to make contact with the leather, extract the probe, and lightly tap the distal end of the guide plate to fix the position
Self drilling implantation
Notes:
-It is strictly prohibited to use electric tools to implant this series of bone screws. Excessive rotation speed may cause high temperature and cell necrosis
-Regardless of whether pre drilled or not, screw implantation should only use a specialized hand drill or T-wrench
Operation points:
-Apply moderate force to allow the screw to enter the first cortex
-The screw is equipped with a round handle design and can be implanted and removed using specialized tools
-Use a hand drill to insert screws into the bone through a guide plate. Maintain the stability of the hand drill to ensure consistent direction throughout the entire process
-Reduce the rotational speed when touching the second cortex; Rotate four more times until the tip just passes through the distal cortex
-In cancellous bone, the tip of the screw does not need to protrude from the second cortex
-Backbone screws should always be implanted in the center of the bone axis to avoid weakening the bone
-Pay attention to the torque changes during the implantation process. If there is abnormal resistance, it is recommended to remove the screw, clean it, and use a 4.8mm drill bit to re drill the hole
Note: Self drilling screws with a diameter less than 5 millimeters can be used for manual or low-speed electric drill implantation
Implant after pre drilling
1. Insert the 3.2mm or 4.8mm drill guide into the screw guide plate and introduce the corresponding drill bit
2. Drill through the first cortex at 500-600 RPM, ensuring that the drill bit is perpendicular to the bone
3. Apply force firmly, shorten drilling time as much as possible, and avoid thermal damage
4. Pause at the second cortex, offset the drill bit limit ring by 5 millimeters, and continue drilling
5. Ensure that the drill bit fully penetrates the second leather layer
6. Remove the drill bit and guide plate, and maintain pressure on the screw guide plate
7. Use a T-shaped wrench or hand drill to implant the screw until it reaches the second cortex
8. Rotate four more times to ensure that the screw protrudes about 2 millimeters from the second cortex
Important reminder: Due to the conical design of the thread, rotating counterclockwise for more than two turns will damage the bone screw interface
Screw rod cutting
After all screws are implanted and the guide plate is removed, the fixator can be installed. After firmly locking the fixing clip onto the screw, the screw rod can be cut using a specialized tool. Although it can be trimmed before implantation, the length is difficult to measure accurately. It is recommended to operate after the fixator is in place.
Key steps: First, insert all screws, and then firmly fasten the clamp fixture at a distance of about 20 millimeters from the skin. Then slide the cutting tools over the screw rod one by one and approach the fixed clamp for cutting. Usually, the screw rod protrudes about 6mm from the fixture. The tool design allows for operation in adjacent fixture seats. After cutting, a protective cap can be used to cover the cut end of the screw. When cutting, the blade arm should be fully extended to improve efficiency, and the outer end of the screw should be fixed to prevent accidental injury.
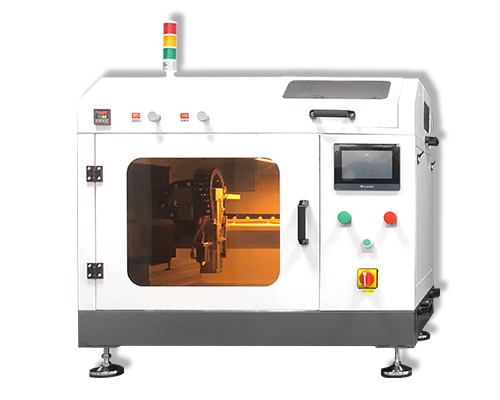
In the field of orthopedic implant device manufacturing, ultrasonic spraying technology provides an efficient and precise solution for the preparation of bone screw coatings, becoming one of the key processes for improving the biological performance of implants. This technology utilizes high-frequency ultrasonic vibration energy to atomize biocompatible coating materials (such as bioceramics, degradable polymers, etc.) into micrometer sized uniform particles, which are then precisely attached to the surface of bone screws at a controllable spray rate, forming a dense and uniformly thick functional coating.
Compared to traditional spraying techniques, ultrasonic spraying can effectively avoid problems such as bubbles, cracking, or uneven thickness of the coating, ensuring a firm bond between the coating and the screw substrate, and reducing the risk of coating detachment after surgery. At the same time, by adjusting parameters such as ultrasound frequency and spraying distance, the coating thickness can be flexibly controlled (usually accurate to a few micrometers) to meet the performance requirements of bone screws in different clinical scenarios. For example, bone screws used for osteoporosis patients can enhance their friction with bone tissue by thickening the coating layer, improving initial fixation stability.
In addition, the coating prepared by this technology can endow bone screws with better biological activity, promote the adhesion and proliferation of bone cells on the screw surface after implantation, accelerate the fusion process of bone tissue and screws, thereby shortening the postoperative recovery time of patients, reducing the probability of complications such as implant loosening and rejection, and providing important support for the safety and effectiveness of minimally invasive orthopedic surgery.
About Cheersonic
Cheersonic is the leading developer and manufacturer of ultrasonic coating systems for applying precise, thin film coatings to protect, strengthen or smooth surfaces on parts and components for the microelectronics/electronics, alternative energy, medical and industrial markets, including specialized glass applications in construction and automotive.
Our coating solutions are environmentally-friendly, efficient and highly reliable, and enable dramatic reductions in overspray, savings in raw material, water and energy usage and provide improved process repeatability, transfer efficiency, high uniformity and reduced emissions.
Chinese Website: Cheersonic Provides Professional Coating Solutions
